What’s in this tutorial?
- Publishing add-in installer
- Installing the add-in
- Creating an update
- Automatic updates
- Register self-created certificate in Trusted Root Certification Authorities
This guide gives you a quick introduction to ClickTwice implantation, explains how ClickTwice fits into the Add-In-Express. And gives you hand on jumpstart to creating an add-in installer to publish and even how to enable that for automatic updates with the ClickTwice approach.
Now, let’s fold your sleeves and kick your engine for getting started
Publishing add-in installer:
You have an add-in project with his setup project. Please first check to rebuild the whole solution with the setup project. Once it builds successfully, you are good to go with publishing the installer, and it’s time to show the world what you have just done and it’s time to get the applause.
Right click on the add-in project and hover over to the Add-in Express menu it will show you some other options, like in below shot:
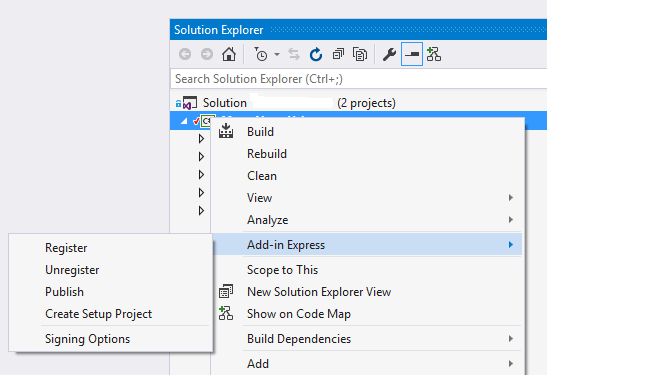
Click on the Publish button, the popup with some configuration will be shown, just like this:
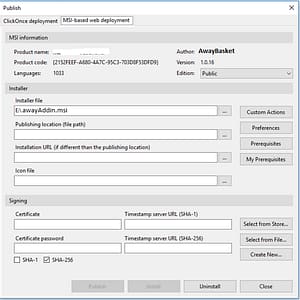
In this above dialog, you can see two options, one is ClickOnce deployment and other is MSI-based web deployments.
In this guide, we are covering MSI-based web deployments.
You can see MSI information like Product Name, Product Code, Author, Version number and Languages already gets populated from your setup project.
On the installer section, the Installer file path also gets populated by default, you can change that path of MSI (but you don’t need to).
Now below this, you can see two input locations for Publishing location and Installation URL.
These two are different if you have another, installation path than Publishing URL. If you don’t specify the Installation URL then it will be the same as the Publishing location.
The installation path is that path where your program will locate for an update.
And below you will see Signing information for the publish code signings.
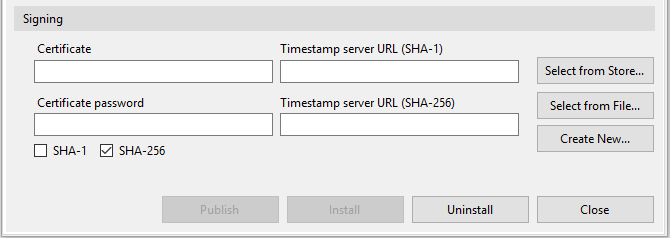
Here in this, you have to give certificate information, either you can select from your store or you can add a new certificate file by clicking ‘Select from File…’ or create a new certificate by clicking ‘Create New.’.
Once you selected that, you are good to go for publishing the package in the Publishing Location you just specified above.
Now go to your published location and you will see published the package.
Installing the add-in:
Just copy all the published packages to the installation location (if you have specified in the publish dialog) or provide a user with the web link so that they install from running the setup file in the version folder. The installer will run and download the MSI file and other prerequisites from the installation location and install it to the local machine.
Creating an update:
Upgrade the version number of your project, build the setup again with an updated version and publish with the same setting we just did above. You will see another folder appears in a published package. Just copy and paste all packages to your specified Installation path.
Automatic updates:
When you paste all your upgraded published packages to the installation location the user will be prompted by the windows notification saying the New update is available.
You can go to the Preferences section from the publish dialog to update if you want to change your preferences about updates.

The above check boxes are self-exoplanetary, you can check uncheck that suits you according to your need. But for automatic download please check ‘Enable auto-download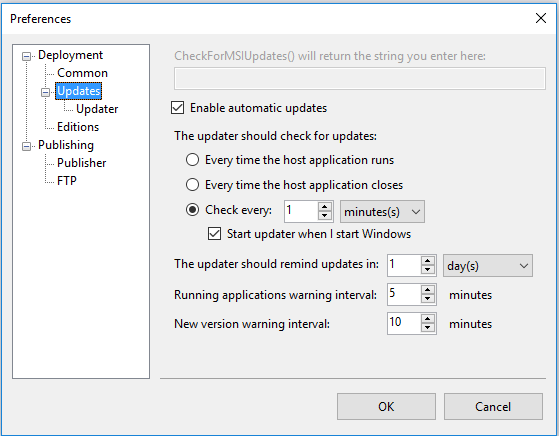 ’.
’.
Here in the above dialog shot you can change the setting for updates according to your choice, like if you want to check for the update right after every time interval or if Every time when host application starts. That’s all up to you.
Register self-created certificate in Trusted Root Certification Authorities:
As you see that you have created a certificate before publishing your package if you don’t specify that you are unable to publish the package.
But we created the certificate above and used that while publishing our package, right? But haven’t you gotten an update notification from windows and did you try to click on that and say ok download a new update for me? Do that work fine and does your product gets updated to the new version? No!
And now are a little confused you have already read all 767 words from the top and at the end, you realized that updates are not working and giving an exception. Let me tell you one thing here, if you get certificate chain processed exception you are on a right track, believe me.
And please don’t unfold your sleeves. Let’s do one thing to fix that exception.
As you have created the certificate but you must have to register that certificate to your Trusted Root Certification Authorities. It actually trusts you are doing to the code you will use to access that project features if you register that into the trusted authority of your system, you will be good to go.
Please follow below steps for certificate registration:
- Press window key + r, type mmc and then press Enter.
- Click File and then Add/Remove Snap In… or press ctrl + m.
- Under Available snap-ins, click Certificates and then click Add.
- Under This snap-in will always manage certificates for, click Computer account, and then click Next.
- Click Local computer, and click Finish and then click OK.
- In the console tree, double-click Certificates.
- Right-click the Trusted Root Certification Authorities store.
- Click Import to import the certificates and follow the steps in the Certificate Import Wizard.
Now, you are good to go with the update, click on the windows notification prompt to get the update and click download. The installation wizard will be popped up and you will be able to install the new version. Yuppie!
If you want to make a group policy to install the certificate to the domain, please follow the below steps:
- Open Group Policy Management Console.
- Find an existing or create a new GPO to contain the certificate settings. Ensure that the GPO is associated with the domain, site, or organizational unit whose users you want affected by the policy.
- Right-click the GPO, and then select Edit. Group Policy Management Editor opens, and displays the current contents of the policy object.
- In the navigation pane, open Computer Configuration\Windows Settings\Security Settings\Public Key Policies\Trusted Publishers.
- Click the Action menu, and then click Import.
- Follow the instructions in the Certificate Import Wizard to find and import the certificate.
- If the certificate is self-signed, and cannot be traced back to a certificate that is in the Trusted Root Certification Authorities certificate store, then you must also copy the certificate to that store. In the navigation pane, click Trusted Root Certification Authorities, and then repeat steps 5 and 6 to install a copy of the certificate to that store.
(source: For GPO)
Hope you understand all that I said here, You can unfold your sleeves now and switch off your engine to take some rest.
Still, if your engine is in good condition and you have some questions, you can ping me here below. I will reach out to you as soon as possible. We will sit together to solve your problem if you will have any.
Till then Do what you love Bye 🙂